
Select a Rift from the dropdown to see only those steps. Tick off items as you go — your progress is saved locally in your browser.
🔵 Season 1 — Bad Signal Dark Aether Rift
Relevant Story Mission: Bad Signal
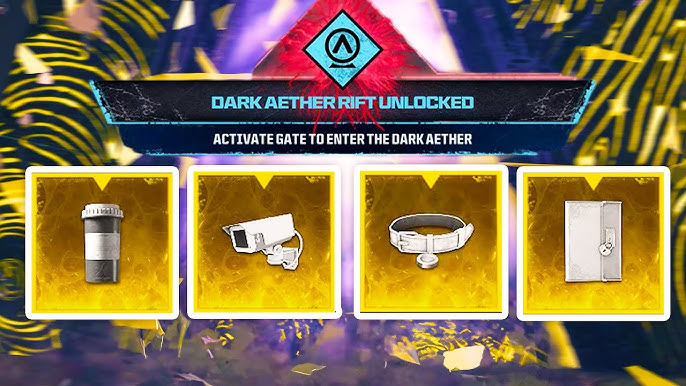
Relics (pre-upgrade)
- Locked Diary — reward at completion of Bad Signal.
- Dog Collar — after Bad Signal, throw a Molotov into a Doghouse, kill the Hellhound, pick up the collar.
- Pill Bottle — equip Brain Rot; at an Aether Nest, shoot a Cyst until it turns green; interact to collect.
- Surveillance Camera — equip Dead Wire; destroy a Harvester Orb; pick up the camera.
Keys & How to Obtain / Upgrade
🔑 Locked Diary
How to Get:
- Complete Bad Signal (Act 4) and defeat Gorm’gant. Collect the Locked Diary from the Reward Rift.
Upgrade to Gold:
- This relic is already gold upon obtaining, no further action needed Gold Diary.
🔑 Pill Bottle
How to Get:
- Equip Brain Rot.
- Go to an Aether Nest, shoot a Cyst until it turns green, interact to collect the Pill Bottle.
Upgrade to Gold:
- Enter an Aether Rift with the Pill Bottle.
- Parachute to a green Rift in the Low Threat Zone and complete the contract for the Gold Pill Bottle.
🔑 Surveillance Camera
How to Get:
- Equip Dead Wire, destroy a Harvester Orb, collect the Surveillance Camera.
Upgrade to Gold:
- Enter an Aether Rift with the Camera.
- Parachute to a gold Rift in the Medium Threat Zone; complete the contract for the Gold Camera.
🔑 Dog Collar
How to Get:
- Get a Molotov and a Chunk of Flesh, use them at a Doghouse to spawn a hostile Hellhound.
- Kill it and collect the Dog Collar.
Upgrade to Gold:
- Enter an Aether Rift with the Collar.
- Parachute to a red Rift in the High Threat Zone; complete the contract for the Gold Collar.
Open the Rift
- Place all Gold keys on the pedestals at the Season 1 Dark Aether Rift to unlock it.
🟣 Season 2 — Dark Aether Rift (Countermeasures)
Relevant Story Mission: Countermeasures
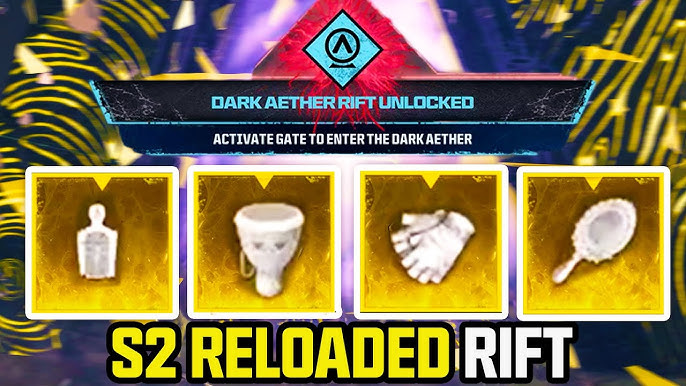
Pedestal Keys & How to Get
🔑 Drum
- Complete the Countermeasures story mission; collect from the Reward Rift.
🔑 Tattered MMA Gloves

How to Get (Obelisk challenge):
- Activate the obelisk on the ship. Upon activation, an Insta-Kill drops nearby.
- Use melee-only (weapon or fists) to kill all spawned zombies during the event.
- After completion, a Reward Rift appears — claim the Tattered MMA Gloves (epic).
Extra context: Keep a melee weapon ready (like a strong knife) and clear space before starting. Having teammates hold or kite nearby spawns makes it safer to chain melee kills while Insta-Kill is active.
Upgrade (Season 2 process):
- Location: Gym (tile F7, Zaravan Suburbs).
- Offer the gloves in the center of the boxing ring.
- Three punching bags spawn on the right; punch each bag once left→right to set them on fire.
🔑 Perforated Target

How to Get (Obelisk challenge):
- Activate the obelisk at tile E3.
- From this point, you must kill every zombie with headshots only.
- After completing the challenge, a Reward Rift appears — claim the Perforated Target (epic).
Extra context: Bring a precise weapon (semi-auto or single-fire helps). Avoid explosive damage, AOE field upgrades, and companions that might steal body kills. Teammates can keep distance and ping spawns so you line up clean headshots.
Upgrade:
- Location: Shooting Range (tile H8, Shahin Manor).
- Offer the key at the middle target; shoot glowing targets to spawn a unique zombie.
- Kill that zombie with a headshot.
🔑 Pristine Mirror

How to Get (Obelisk challenge):
- Activate the obelisk at tile I8 to begin the challenge.
- Watch the elemental ring that appears (e.g., Fire). Take the matching Ammo Mod and kill zombies inside the area.
- When the element changes, quickly swap to the new matching Ammo Mod and continue killing.
- On completion, a Reward Rift appears — claim the Pristine Mirror (epic).
Extra context: The ring can cycle between elements (e.g., Fire → Electric → Cryo, etc.). Park near the mod stations so you can swap fast. Teammates can call out the next element and funnel zombies into the zone for you.
Upgrade:
- Location: Graveyard (tile I3).
- Offer the mirror at a grave; three zombies spawn.
- Kill each with a different Ammo Mod (mods available in a nearby lit tower).
Open the Rift
- Place the upgraded keys on their pedestals at the Season 2 Dark Aether Rift to unlock.
🟡 Season 3 — Dark Aether Unlock (Union)
Relevant Story Mission: Union
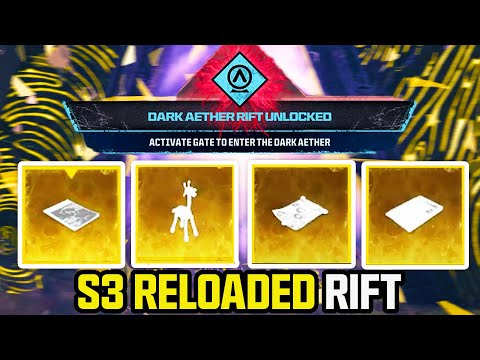
Relics
Giraffe Toy (pre-attuned), Laptop with Stickers, Science Journal, Imaginary Friend Drawing
Collect all four, then attune (upgrade purple → gold) as below.
🧸 Giraffe Toy — (No attune required)
- Complete the Union Story Mission (Season 3 Reloaded) and collect from the Reward Rift.
💻 Laptop with Stickers
Obtain (unattuned):
- Farm Chunks of Flesh by destroying zombies (PAP, explosives, or ACV in Escort contracts).
- Summon a Hellhound at a Doghouse using Chunks matching zone Threat Level.
- Have the Hellhound kill a Sergeant Merc (red beret) at a Merc Camp or during Defend Ground Station/Aether Extractors.
- A Reward Rift spawns with the unattuned Laptop.

Attune (to gold):
- In Sector F5, NW of Opal Palace, find the rune triangle near the crumbling walls.
- Stand on the roof at the base of Opal Palace staircase (doorway) to align the Aetherial markings into a triangle (map ref).
- Kill zombies inside the purple ring until the sound cue; defeat the Mimic to get the Attuned Laptop.

📓 Science Journal
Obtain (unattuned):
- Find an Aether Storm (purple biohazard circle; location varies). Bring a Gas Mask.
- Kill 50 zombies in the Storm (Kazmir Grenades help). Avoid the Stormcaller Disciple.
- A Reward Rift spawns with the unattuned Journal.

Attune (to gold):
- In Sector E3, near the Rift altar by Nahr Bathhouse, stand on the northeast archway facing the bridge to align the triangle (map ref).
- Kill zombies in the ring; defeat the Hellhound to get the Attuned Journal.

🖍️ Imaginary Friend Drawing
Obtain (unattuned):
- In Sector I7 (Zohoor Ranch), go top floor of main building; interact with the container under the bed.
- A Reward Rift spawns on the bed with the unattuned Drawing.

Attune (to gold):
- In Sector F5, Opal Palace NE destroyed wall — find the triangle at the staircase top (map ref).
- Climb, jump the gap, face the rune area to align triangle; kill zombies in the ring; defeat the Mangler for the Attuned Drawing.

Note: You can attune across multiple matches. Use Tombstone to recover Relics if you die, or carry only what you plan to attune.
Open the Rift
- With all Attuned relics, go to Sector E4 NW of the High Threat Zone island (near the story mission portal).
- Place relics on the matching altars around the Aetherial tornado circle.
- Defeat the Disciple boss (kill invincible Minions first to expose it).
- Reward Rift grants a Sigil (T4) or Elder Sigil (T5); use it to enter the Dark Aether.
🟢 Season 5 — Dark Aether Unlock
Complete the Ascension Story Mission, then collect and upgrade the four artifacts.
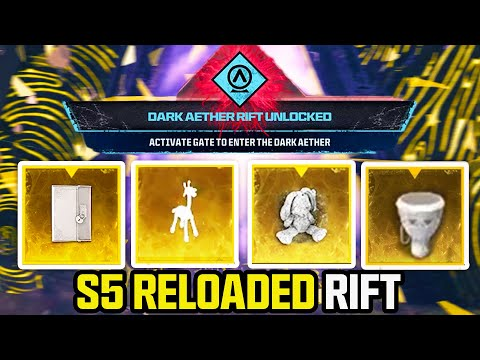
🔑 Mr. Peeks
- Obtained at the end of the Final Story Mission in the Reward Rift.
🔑 Echo of Drums
- Complete a race between two “Mr Peeks” using the Bloodburner (east side of T3).
- Upgrade: interact with a Meteor at F7.
- Zombies will spawn with AAT effects — use the pillars to swap to the matching AAT.
🔑 Echo of Diary
- Kill 5 Special Zombies (e.g., Mimics) with an Aether Blade.
- Upgrade: interact with a Meteor at D2.
- After teleport, with PHD Flopper equipped, dolphin dive onto the blue crate under the Nuclear Tower.
🔑 Echo of Giraffe
- Use the Sergeant’s Beret schematic and perform a Finishing Move on a Mercenary.
- Upgrade: interact with a Meteor at F4.
- Eliminate all HVTs that spawn.
Open the Rift
- Once all four artifacts are upgraded, place them on their pedestals at F5 to open the Dark Aether Rift.
Built for Plague’s MWZ community • Replace image placeholders in images/ as needed.